Over the years, I've received my fair share of bad surveys. These tend to be easier to identify than good ones — in fact, you've probably taken some bad surveys yourself.

The questions are often poorly-worded and tend to drag on forever. As a result, you might find yourself unable to complete them due to boredom, frustration, or the time investment required.
Good surveys, on the other hand, are seldom forgettable. The best experience you can aim for as the creator of a survey is for the respondent to a) finish and submit the survey, and b) think, "Well, that was tolerable."
Are you ready to learn how to create good surveys that your customers will actually fill out to provide you with valuable feedback? Below are a few tips that will help you develop interesting and valid surveys along with specific tools you can use to create them.
How to Create a Survey
- Choose the right platform.
- Make the survey as short as possible.
- Don't ask 'yes' or 'no' questions.
- Randomize your answer options.
- Keep your question text neutral.
- Use matrix questions judiciously.
- Align questions and answers to each type of respondent.
- Include a 'red herring' question to weed out inattentive respondents.
In a few straightforward steps, you can create a survey that gets your team the information you need while keeping your respondents engaged throughout the entire survey.
.webp)
5 Free Customer Satisfaction Survey Templates
Easily measure customer satisfaction and begin to improve your customer experience.
- Net Promoter Score
- CSAT Score
- Customer Effort Score
- And more!
Step 1: Choose the right platform for the survey.
Creating a proper survey starts with choosing the right platform. For example, if you're trying to survey your Facebook fans, your survey should probably live on Facebook. On the other hand, if you want to email your customers a survey, you'll want to make one using Google Forms.
Additionally, think about how you want to use the data. For example, if you're collecting a ton of data that you want to break out and analyze, you should create your survey using Microsoft Forms so you can download the results as a spreadsheet.
Step 2: Make the survey as short as possible.
Focus on what's really important. What data do you need to make your argument, launch your campaign, or change a product? Extraneous, "good to know" questions bog down surveys and dim their focus. Remember that your survey respondents don't really care about what is interesting to you or your company — they care about how quickly they can finish the survey.
It's important to note that drop-offs happen more with longer surveys. So what would your boss prefer: A nice and thorough survey with only 15 completed responses, or a shorter, tighter survey with 200 responses? Probably the latter.
If your survey is on the longer side, guide your respondents through the sections. Let them know what you're going to ask them. Give them cues when they're almost done, something like ("In this last section, we're going to ask you …"). If your survey tool allows it (Google Forms does), show them a progress bar to know how much of the survey is left. And always thank them for taking the time to give feedback.
Step 3: Avoid "Yes" or "No" questions.
Because of psychological bias, respondents tend to answer yes when asked a "yes" or "no" question (unless you ask if they've done something wrong).
Instead of asking directly, try to get at the answer in a more roundabout way. For example, give them a list of options and ask if they use or know any of the items listed. Only let respondents move on if they happen to select the item(s) you are interested in. Then, you can be sure the people who answer your question are more likely to be honest with their responses.
Don't do this:

Do this:

Step 4: Randomize your answer options.
There's also a first-choice bias in surveys, where people automatically click the first answer listed. It's prevalent in "select all that apply" type questions. Randomizing your options helps combat a survey taker's tendency to check the first option they're given.
Most survey tools will allow you to anchor options such as "Don't know" or "None of the above" at the bottom of the list and exclude them from randomization.
Not so great:

Great:

Step 5: Keep your tone neutral.
Asking leading questions can influence your respondents to answer a certain way. If you publish your results where the question is visible, your readers may question the validity of your data.
Here's an extreme example to show you what I mean:
"Don't you think product X is amazing in the following ways? Yes, it is amazing because of x. It's amazing because of y. It's amazing because of z."
Instead, ask:
"How would you rate product X on a scale of 1 to 5?"
And if you want to know what specifically they like, you can follow up with people who answer 4 or 5 on why they love it. Of course, you can do that with the people who answer the lower ratings, too. This gives you way more actionable data on what people love about your product and what you need to work on.
Here's an example of a leading question:

Here are two neutral questions that will yield unbiased feedback:

Step 6: Use matrix questions judiciously.
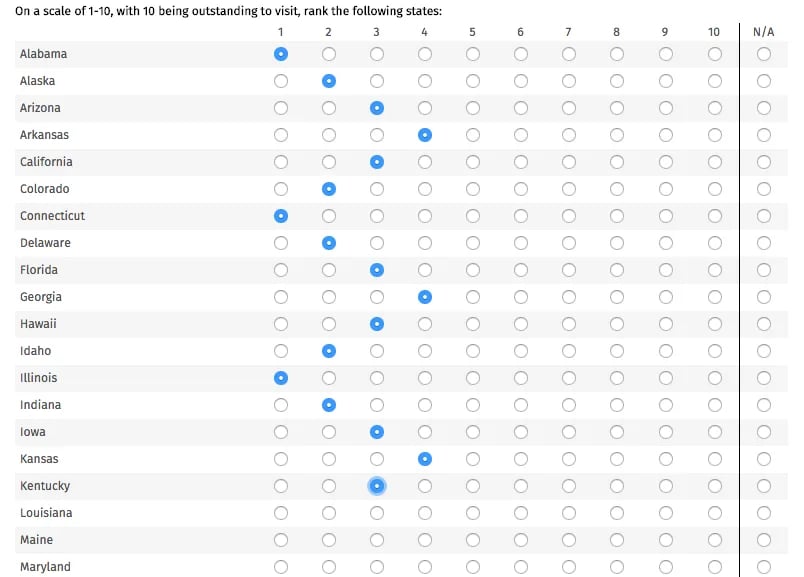
Your survey should not have more than a few matrices. These are for asking complicated questions — so only use them for important questions
Additionally, each matrix should have no more than seven row or header options to prevent survey recipients from being visually overwhelmed.
An example of a manageable questionnaire is shown below:

This one, on the other hand, is intimidating:
Step 7: Align questions and answers to each type of respondent.
You may live and breathe your product or industry, but you should not assume your survey respondent knows what you're talking about.
It never hurts to give examples and explain concepts or jargon to educate respondents who are less knowledgeable than you. Likewise, make sure you provide answer options that give your respondent an out if they don't know an answer.
.webp)
5 Free Customer Satisfaction Survey Templates
Easily measure customer satisfaction and begin to improve your customer experience.
- Net Promoter Score
- CSAT Score
- Customer Effort Score
- And more!
An example of this is asking whether someone's team got bigger or smaller. While it may seem innocuous on the surface, you're actually excluding some possible answers. For example, maybe the respondent's team stayed the same, or the respondent is a new hire and does not know how big the group was a year ago. So make sure you have options those people can select.
This question limits respondents to just two options:

This question includes more options that respondents can choose from:

Step 8: Include a "red herring" question to weed out inattentive respondents.
As a quality check, you can ask a simple demographic question at the beginning and end of each survey. This is especially important when you're designing longer surveys — because you may be surprised (and dismayed) to see how many respondents forget what country they're from or how many employees their company has.
You shouldn't always toss out respondents based on just the red herring mismatch, but you can use it in conjunction with other checks to validate the quality of a respondent's answers. For example, only remove a response if the survey taker failed the red herring and answered "Don't know" for 5 out of 10 questions in your survey.
Now that you know what makes a good survey, it's time to learn how to start creating one. So keep reading to learn how to create surveys in Microsoft Excel, Microsoft Word, Google Forms, Facebook, or SurveyMonkey.
How to Make a Survey in Microsoft Forms
- Log into your Microsoft Office 365.
- Select 'Forms' from the starting menu in the upper left-hand corner of OneDrive.
- Give your form a title and a description that recipients will read.
- Select the type of answer that recipients will submit.
- Fill in the questions and repeat this process until your form is complete.
- Send it to recipients using the 'Share' button in the upper right-hand corner.
Creating a survey in Microsoft Forms is simple. Simply log in to your Microsoft Office 365 account, create a new form, and add your questions. Here's a step-by-step guide on how to do it.
Step 1: Log into your Microsoft Office 365 account.
You can set this up on OneDrive, or create one for free.
Step 2: Select "Forms" from the starting menu in the upper left-hand corner of OneDrive.
Select Forms survey to get started creating a new survey.
Step 3: Name your form and add a description.
Then, click Add question.
Step 4: Select the types of answers that recipients can choose from.
Options include multiple-choice, text, a rating system, etc.

Step 5: Fill in the questions.
Make sure you toggle the Multiple answers or Required buttons, if applicable.
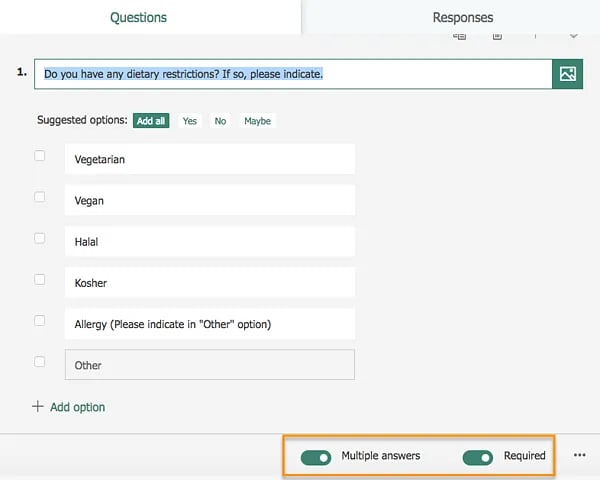
Step 6: Send the survey to recipients using the "Send" button.
You can send the survey via email, link directly to it, or embed it on a web page.

How to Make a Survey in Microsoft Word
- Start with a blank document or search for 'Form' in the templates gallery.
- Show the developer tab.
- Click where you want to add content to your survey, then choose the type of control for the survey field.
- Input instructional text or drop-down menu options.
- Click the 'Review' tab, click 'Protect,' then select 'Protect document.'
- Share your form with recipients.
If you need to disclose information to your respondents before or after they complete your survey, create it in Microsoft Word. This way, you can add text, images, or other visual aids that may help respondents answer the survey questions more accurately.
.webp)
5 Free Customer Satisfaction Survey Templates
Easily measure customer satisfaction and begin to improve your customer experience.
- Net Promoter Score
- CSAT Score
- Customer Effort Score
- And more!
Step 1: Start with a blank document or search for "Form" in the templates gallery.
Choose the template that best meets your needs, and click Create.

Step 2: Find the developer tab.
Find the developer tab on a PC by clicking File> Options > Customize Ribbon > Main Tabs > Developer > OK.
Show the developer tab on a Mac by clicking Word > Preferences > Authoring and Proofing Tools > View > Show developer tab.

Step 3: Add content to your survey then choose the type of control for the survey field.
For example, if you want respondents to type in an answer, choose Text Box, or if you want respondents to select from a group of answers, select Combo Box. (The control will appear as a grey box in Word.)

Step 4: Input instructional text or drop-down menu options.
This will allow respondents to choose between a set of answer options.
Step 5: Click the "Review" tab, then "Protect," and select "Protect Document."
That will protect recipients from editing the questions while allowing them to fill in their answers.

Step 6: Share your form with recipients.
Recipients can fill it out on a computer and print it, or print it then fill it out by hand.
Featured Resource: 5 Free Customer Satisfaction Survey Templates
How to Make a Google Survey
- Open your Gmail account menu and select 'Forms.'
- Select a blank form, or use a template from the gallery.
- Name your survey and add a description.
- Create your form questions by selecting a question type.
- Add multimedia elements, sections, or unique formatting options using the sidebar menu.
- Adjust the form settings.
- Send the survey to your recipients.
You can use Google Forms to not only make your survey but also share it with respondents. Rather than including a link to the survey, you can simply include their email addresses and click send. This saves you a few extra steps, making the entire process quick and easy.
Step 1: Open your Gmail account menu and select "Forms."
You may have to click More to see this option.

Step 2: Select a blank form, or use a template from the gallery.
Options include event feedback forms, time off request forms, and more.

Step 3: Name your survey and add a description.
Make sure the name of your survey is clear and spelled correctly, as this will be the most prominent wording on the form.

Step 4: Create your form questions by selecting a question type.
Then, you can begin entering options for recipients to choose or write in answers. (Make sure to toggle the Required button for mandatory answers.)

Step 5: Add multimedia elements, sections, or unique formatting options using the sidebar menu.
You can use this to rearrange or break up the order of different survey questions.

Step 6: Adjust the form settings.
You can include options to make the form include a quiz, a confirmation message, and collect recipients’ email addresses.
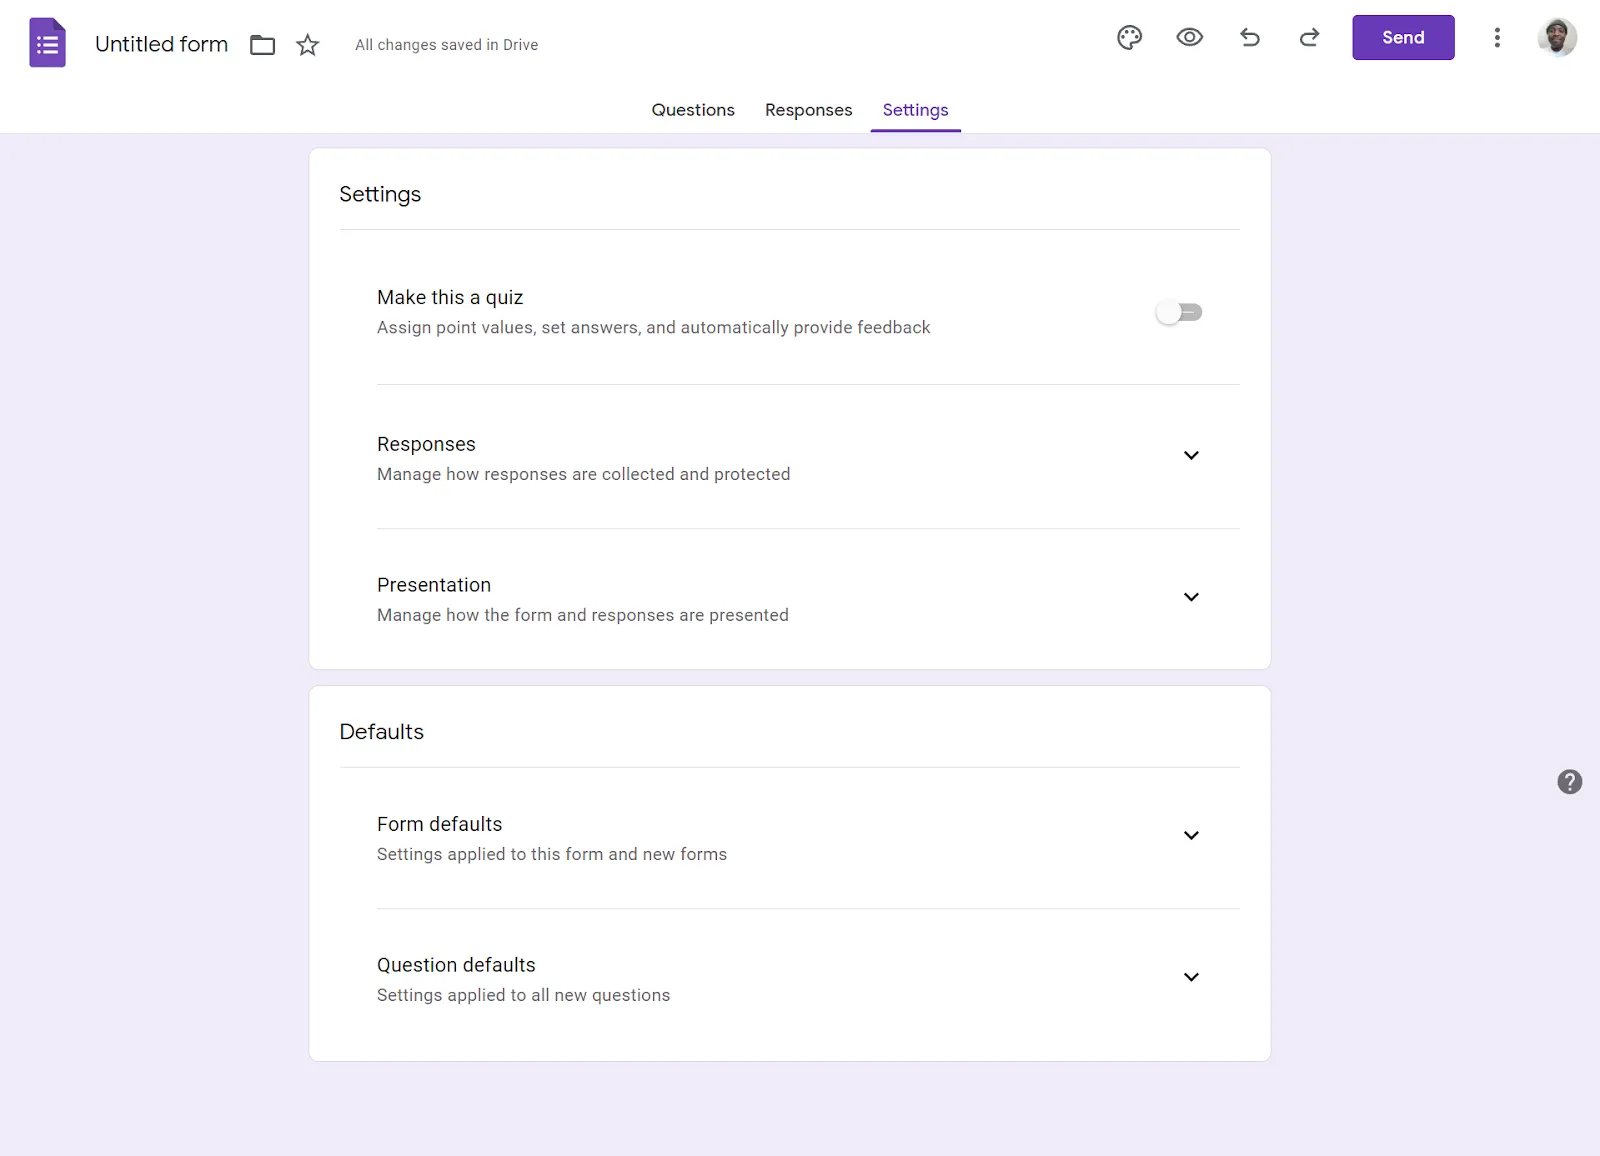
Step 7: Send the survey to your recipients.
Add collaborators to your survey by clicking the Send button in the upper right-hand corner.

Featured Resource: 5 Free Customer Satisfaction Survey Templates.webp?width=375&height=275&name=58b89GVG4neVtMHbaMJGV2yELCuxayfUrBUJqgatmUJNrf5HMI53Hu0Dbeqewepr4xKS8iRUPC-OGlJ-sdIanMf8Yohm-usX5hEvYR8Qf4cpqcyFEd_4QYlURtMFt1kN4RFWkY08%20(1).webp)
How to Create a Survey on Facebook
- Enter 'survey' in your Facebook search bar.
- Select the 'Use app' button on the facebook page.
- Give the survey permission to use your profile information.
- Customize your survey questions and answer options.
- Name your survey.
- Customize your survey question and answer options.
- Preview your survey.
- Publish your survey on your profile or business page.
Facebook offers two options for creating surveys: a simple poll or the Survey app. The poll option only allows you to ask one question, whereas the Survey app allows you to customize and expand your survey to multiple different types of questions. Read below for instructions for creating both:
Step 1: Enter "Survey" in your Facebook search bar.
Under All results, select the first option called Survey. This should bring you to the app's Facebook page.
Step 2: Select the "Use app" button on the Facebook page.
There should be an option at the top on the app’s Facebook page where you can Use App.
Step 3: Give the survey permission to use your profile information.
You'll need to grant the app access to your Facebook profile before you can start using it. Don't worry, it won't post anything on your behalf unless you instruct it to.
Step 4: Name your survey.
Now it's time to name your survey. You can also edit this later in the setup process.

Step 5: Customize your survey question and answer options.
The next step is to start filling out your survey. Facebook's surveys allow you to use all types of survey questions, and you can bulk import multiple-choice options using a rich-text field.

Step 6: Preview your survey.
Once your questions are filled out, you can preview your survey before publishing.
Step 7: Publish your survey on your profile or business page.
The final step is to publish your survey and make it live on your page. Again, you have a few options here. You can either create a unique post for your survey, share it via URL, or invite individual followers to complete it.

How to Make a Poll on Facebook
- Enter 'poll' in your Facebook search bar.
- Select the 'Use app' button on the Facebook page.
- Give the poll permission to use your profile information.
- Name your poll.
- Customize your poll question and answer options.
- Preview your poll.
- Publish your poll on your page.
Sometimes a survey may be too much of a hassle to collect the data you're looking for. Opt for a Facebook Poll instead. With Polls, you can solicit feedback from your Page followers and fans on simple topics. With the click of a button, respondents can weigh in on any topic you choose to discuss. Plus, they'll get to see an aggregate of the responses to know whether they're in the majority or minority opinion
.webp)
5 Free Customer Satisfaction Survey Templates
Easily measure customer satisfaction and begin to improve your customer experience.
- Net Promoter Score
- CSAT Score
- Customer Effort Score
- And more!
Step 1: Enter poll in your Facebook search bar.
Under the All results, select the first option called Poll. This should bring you to the app’s Facebook page.

Step 2: Select the "Use App" button on the Facebook page.
Select the Use App option.

Step 3: Give the poll permission to use your profile information.
You’ll need to grant Poll access to your Facebook profile before you can start using it. As with Surveys, it won’t post anything on your behalf unless you instruct it to.

Step 4: Name your poll.
Next, name your poll.

Step 5: Customize your poll question and answer options.
The next thing is to begin filling out the poll. The Poll app allows you to use different types of questions.

Step 6: Preview your poll.
Once the questions are filled out, you can preview your poll before posting.
Step 7: Publish your poll on your page.
Finally, publish your poll and make it live on your page. There are several options open to you. For example, you can create a unique post for the poll, share it via a link, or invite individuals to participate.
How to Create a Survey on SurveyMonkey
- Select the type of survey you want to create.
- Name your survey.
- Add or choose survey questions.
- Send your survey to respondents.
For longer surveys with more functionality and data analytics, try Survey Monkey. You can choose from a variety of question and response options making this survey platform applicable for virtually any type of research.
Step 1: Select the type of survey you want to create.
You can sign up for SurveyMonkey with a free or paid account. Then select how you'd like to begin building your survey. For this tutorial, we'll be buid our survey from scratch.
 Step 2: Name your survey.
Once you've chosen which type of survey you want to deploy, name it and assign it to a category.
Step 3: Add or choose survey questions.
You can start typing in your survey questions, or you can choose from the questions SurveyMonkey recommends for the type of survey you've selected.

Step 4: Send your survey to respondents.
SurveyMonkey offers various options for deploying your survey, including the ability to buy responses from a broader pool.
Once you've selected your option, you're ready to send your survey and start collecting feedback.
Create A Survey People Will Want to Take
If your respondents are taking the time to complete your survey, give them one that is interesting, neutral, and respectful of their time. Now that you have the best practices for how to create a survey, try making one today and see what insights you uncover about your audience.
Editor's note: This post was originally published in August 2020 and has been updated for comprehensiveness.



-2.png)
![How Automated Phone Surveys Work [+Tips and Examples]](https://blog.hubspot.com/hubfs/phone-survey.webp)
-3.png)


![Leading Questions: What They Are & Why They Matter [+ Examples]](https://blog.hubspot.com/hubfs/leading-questions-hero.webp)
.jpg)
