Want to increase the likelihood that people will share your content? Here's the secret: Make it easy.

That's why social sharing buttons are so darn effective. If the button is there, it's extremely simple for people to share your content with their networks. If it's not, it's extremely simple for them to, well ... not. And if you create infographics (and other visuals, for that matter), you should be going the extra mile to make it easy not only for people to share it with their social networks, but also to share it on their own websites, as well.
This is where embed codes come in. Providing embed codes to make it easy for your visitors to share your visual content on their own blog is not only a great way to encourage sharing. It's also a way for you to generate some inbound links too, since the embedded image will automatically link back to your website.
Luckily, embed codes don't just make it easy for the user. They're also pretty easy to create for the marketer, thanks to Siege Media's Embed Code Generator.
We'll walk you through the steps and chime in with some best practices to keep in mind along the way.
Before You Create Your Embed Code
First things first. Upload the full resolution file of your infographic to the blog post or web page you're using to promote it. Then resize the image to fit the width of your blog/page.
But wait! You're not done. Although you have to size it down to fit the page, you still want to offer visitors the option to view the infographic in its full resolution.
There's nothing worse than squinting to read the text on an infographic, so be sure to link the resized image to the full resolution version. To let visitors know they can access a larger version, include a note with something along the lines of "Click infographic to enlarge" so they know they have that option. When you add the link, make sure you configure it to open in a new tab in their browser so it's easy for them to refer back to the blog post itself (where the embed code will be).
Generate Your Embed Code
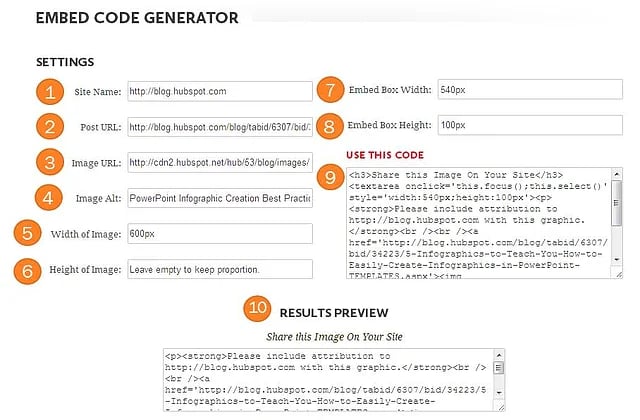
Access Siege Media's Embed Code Generator at http://www.siegemedia.com/embed-code-generator, and start filling out the form.

1) Site Name
This should be the URL you want people who embed your infographic to attribute. It will be included as a message to the person embedding it to "Please include attribution to [insert URL] with this graphic." It's likely they will delete this message before they publish to their site, but it serves as a good reminder to them that they should be attributing and linking back to you as the source of the infographic at least somewhere.
2) Post URL
This should be the URL of where the infographic lives on your site. So if you're using your blog to publish the infographic, include the URL for that particular post. This is important, since this is what the embedded infographic on someone else's site will link back to, giving you those precious inbound links.
3) Image URL
This should be the URL of the infographic image hosted on your site. After you've uploaded the infographic to the blog post/web page you're hosting it on, right click the image and click "Copy Image URL." This is the URL you should paste here.
4) Image Alt
Include some alt text that describes your infographic. We recommend including the title of the infographic as well as the word infographic.
5) Width of Image
Specify the width you'd like the embedded infographic to be. This will vary depending on the width of the user's website/blog (the width of our blog, for instance is 650 pixels), but anyone who embeds your infographic can also adjust the embed code to fit the particular specs of their blog/website by customizing the width='600px' part of the embed code.
6) Height of Image
As Siege Media advises in the generator, leave this empty to ensure the infographic stays in proportion regardless of width.
7) Embed Box Width
This is how wide you want the box that displays the embed code to be on your web page/blog post to be. For example, if the width of your blog is 650 pixels and you want the box to span the width of your blog, make this 650 pixels wide.
8) Embed Box Height
This is how tall you want the box that displays the embed code to be on your web page/blog post. The taller you make it, the more space it will take up, but the less the user will have to scroll to see the full embed code.
9) That's it!
Copy and paste this code into the HTML of your web page/blog post where you want the embed code to appear. I recommend putting it below the infographic, since this is the natural point at which someone would decide they want to embed your infographic; but you could also include it above, since they may be revisiting your page to grab the infographic embed code -- in which case the easier you make it, the better.
10) Preview
This is how the embed code will look on your blog post/web page.
The Embed Code in Action
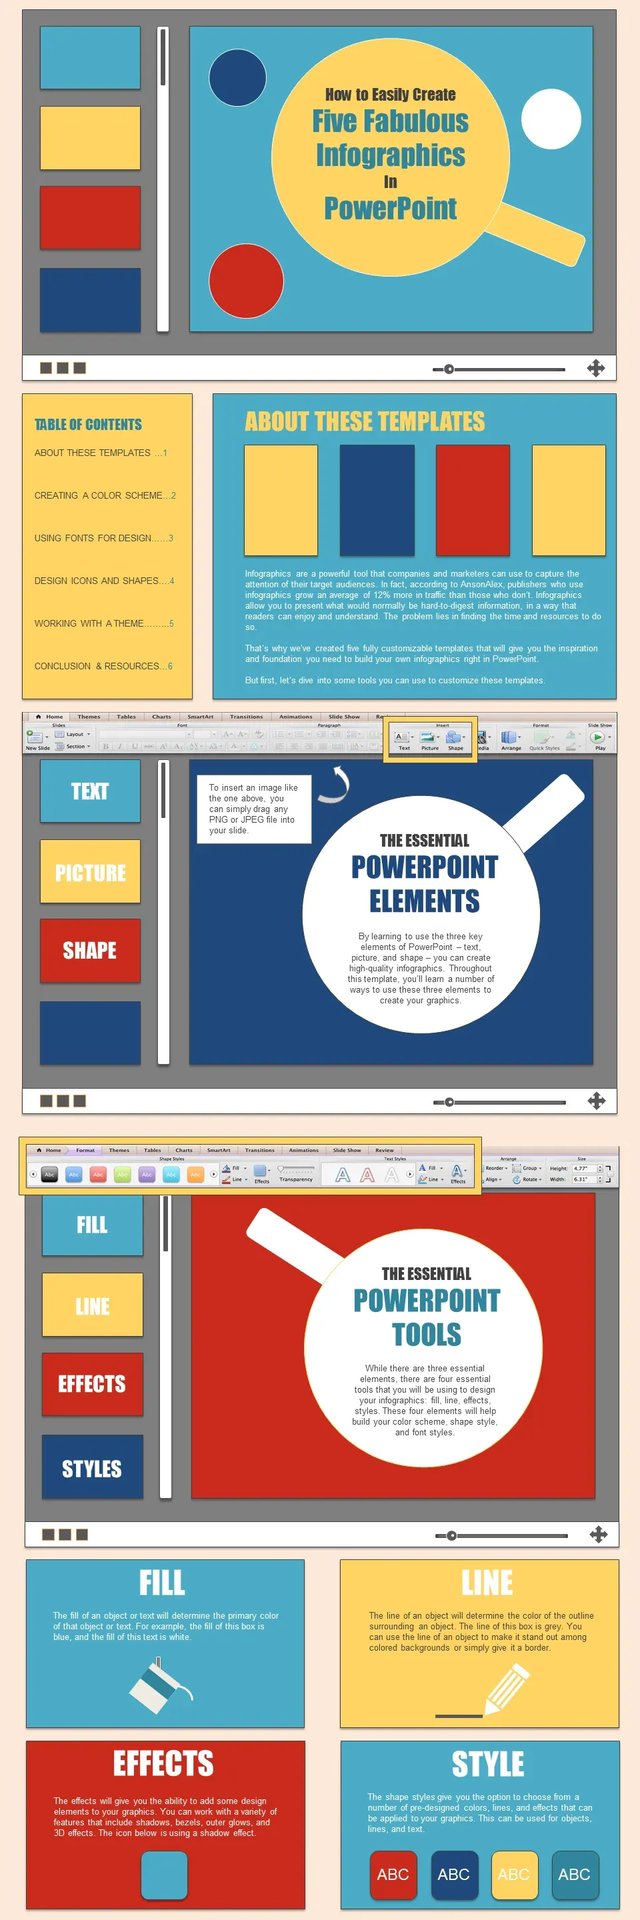
To give you the full experience, let me show you how the embed code would look on a blog post. We'll use our PowerPoint Infographic Creation Best Practices infographic as an example. (Note: This infographic is actually part of our infographic templates offer, which includes five infographic PowerPoint templates you can download here for free.)
Sample
(Click infographic to enlarge.)
Share this Image On Your Site
Don't Forget a Pin It Button!
To give your infographic some extra oomph, create and add a Pin It button next to your infographic as well. Pinterest is all about visual content, so why not make it easy for Pinterest users to share your content, too? To learn how to create a Pin It button, check out our "Ultimate Cheat Sheet for Creating Social Media Buttons."
Have you had success with using embed codes to improve the reach of your infographics? If infographic creation is new to you, get your feet wet with our five free infographic templates in PowerPoint.
Image Credit: Bob Rosenbaum
Want to learn more about infographics? Check out 10 of the Best Infographic Examples of 2016.


![How To Create An Infographic In Powerpoint [+Free Templates]](https://blog.hubspot.com/hubfs/create-infographic-powerpoint_11.webp)
![How to Create the Perfect Project Timeline [Template + Examples]](https://blog.hubspot.com/hubfs/project-timeline-example (1).jpg)


.jpg)